SBS Ports

Just because a port is open in RRAS or ISA (circa SBS 2003) doesn’t mean that it isn’t being blocked elsewhere, like at the ISP or because port forwarding isn’t setup properly in your firewall. Sometimes you need an outside view of the external ports on your internet connection which you can secure with a service like https://cubik.com.tw/.

DISCLAIMER – Only open the ports you absolutely MUST have. Example, if you’re not running the POP3 connector or FTP, don’t open those ports! If you’re not sure about a port, check the Port/IP Lookup on Sans.org or ask someone who knows!

To check all of the commonly used SBS ports at once:

  1. Go to www.grc.com/default.htm
  2. Scroll down & click ShieldsUP!
  3. Click Proceed
  4. In the center box on that page, paste this string:
    21, 25, 80, 110, 123, 143, 220, 443, 444, 500, 987, 1701, 1723, 3389, 4125, 4500
  5. Click User Specified Custom Port Probe

image

This scan will come back with a list of ports you entered and show the status.

Sample scan of commonly used ports in an SBS environment.

Below is a handy chart that I stole from Susan and Windows IT Pro and updated a couple of times over the years.

Common Ports for Small Business Server (SBS)

TCP Port

Service

Description

21%

VN:F [1.9.20_1166]
Rating: 10.0/10 (1 vote cast)

Download – Remote Server Admin Tools for Windows 7

Windows 7 logoRemote Server Administration Tools for Windows 7 enables IT administrators to manage roles & features that are installed on computers that are running Windows Server 2008, 2008  R2, or 2003, from a remote computer that is running Windows 7.

Title: Remote Server Administration Tools for Windows 7
Date Published: 08/11/2009
Download size:
– x64 version 222.1 MB
– x84 version 215.1 MB
File type: MSU
System Requirements: Windows 7 (Professional, Ultimate or Enterprise),
Windows Server 2003, 2008 or 2008 R2 
Download URL: Click here

Overview:

Remote Server Administration Tools for Windows 7 enables IT administrators to manage roles and features that are installed on remote computers that are running Windows Server 2008 R2 (and, for some roles and features, Windows Server 2008 or Windows Server 2003) from a remote computer that is running Windows 7. It includes support for remote management of computers that are running either the Server Core or full installation options of Windows Server 2008 R2, and for some roles and features, Windows Server 2008. Some roles and features on Windows Server 2003 can be managed remotely by using Remote Server Administration Tools for Windows 7, although the Server Core installation option is not available with the Windows Server 2003 operating system.

This feature is comparable in functionality to the Windows Server 2003 Administrative Tools Pack and Remote Server Administration Tools for Windows Vista with Service Pack 1 (SP1).

Source: Scott Hanselman (@shanselman on Twitter)

VN:F [1.9.20_1166]
Rating: 10.0/10 (1 vote cast)

Louisville Geek Dinner v0.7 Tonight

imageTonight the 7th Louisville Geek Dinner will be held at the Bluegrass Brewing Company. The list of attendees is pretty enormous, with 85 registered as attendees, and 15 maybes (and that’s as of this morning). Should be quite a turnout!

  • WHAT: A social networking event for those who love technology
  • WHEN: Monday, August 24, 2009 @ 6:00pm EST
  • VENUE: Bluegrass Brewing Company – Google MapBBC Website
  • ADDRESS: 3929 Shelbyville Rd, Louisville, KY 40207
  • COST: FREE + whatever you choose to spend on food / bevy.
  • HOST: Ben Thomas
  • ATTENDEES: Mac, PC, Linux, Unix, SBS and all other manner of geeks
  • REGISTER: http://www.louisvillegeekdinner.com
  • Twitter: @geekdinner
  • VN:F [1.9.20_1166]
    Rating: 0.0/10 (0 votes cast)

    KYSBSUG Meeting August 19, 2009 – Office 2010 First Look

    This is a friendly reminder about the August KYSBSUG Meeting tonight:

    KYSBSUG logoGroup: Kentucky Small Business Server User Group (KYSBSUG)
    Meeting #: 66
    Meeting Date: Wednesday August 19, 2009
    Time: 6:30 PM Eastern
    Location: Money Concepts
    Address: 323 Townpark Circle, Suite 100, Louisville, KY 40243
    Map: Click here for map on Bing.com

    Presenter: Tim Barrett
    Topic: Office 2010 – First Look

    Description: Tonight we’ll take you on a tour of the new features of the 2010 applications and point you to resources to learn more about the next wave of Microsoft Office.

    Registration URL: Registration is not required for this event.

    VN:F [1.9.20_1166]
    Rating: 0.0/10 (0 votes cast)

    Show Notes – July 2009 KYSBSUG Meeting

    Here are the links from the July 2009 Kentucky Small Business Server User Group (KYSBSUG) meeting:

    TOPIC: “Multimedia Smackdown – Ripping DVDs and Other Cool Stuff” 

    TV Tuners / Streaming

    DVD to WMV / AVI / DivX / XviD

    MP3 Devices / Editing

    Other Links (thx David Hunter)

    Thanks to all those who attended and contributed links. If you have a favorite Video / MP3 / DVD editing tool, please feel free to post a link in the comments.

    VN:F [1.9.20_1166]
    Rating: 0.0/10 (0 votes cast)

    Windows 7 RTM and Other Dates

    image The much-anticipated operating systems Windows 7 hit RTM (Release To Manufacturing) status today (Wed July 22, 2009) which means, in layman’s terms, the program is officially done. The build number is 7600.

    Windows Server 2008 R2 hit RTM today as well. Read about it on the Windows Server Blog:
    When to expect Windows Server 2008 R2 RTM

    Now comes the hard part – more waiting…

    Here are the Windows 7 and Server 2008 R2 dates you need to be aware of:

    Want to download and try out the Release Candidates?
    Here are the download links (until Aug 20, 2009):

    Here’s a short video of the Windows 7 RTM Sign-Off celebration:

    Congratulations to Microsoft and the Windows 7 Team on delivering an awesome product that will finally lay XP to rest (though it may still live on virtually in XP Mode).

    Source: Eric Ligman’s blog

    VN:F [1.9.20_1166]
    Rating: 0.0/10 (0 votes cast)

    SBS 2003-to-2008 Migration Resources

    SBS 2003 to SBS 2008 I wanted to bookmark some handy SBS migration resources:

    SBS 2003-to-2008 Migration Checklist
    File name: SBSMigrationChecklist.docx
    Date Published: 06/24/2009
    Version: 1.0
    File size: 43 KB
    Download URL: Click here

    SBS 2003-to-2008 Migration Whitepaper
    File name: SBS_Migration.doc
    Date Published: 05/13/2009
    Version: 2.0
    File size: 694 KB
    Download URL: Click here

    SBS 2003-to-2008 Migration Click-Thru Demo
    Date Published: 05/12/2009
    Version: 1.0
    File size: 47.5 MB (for the EXE and the documentation)
    Download URL: Click here

    Swing Migration for SBS 2008
    Download URL: http://www.sbsmigration.com/

    Also, if you’re just doing a clean install, don’t forget about Philip Elder’s document.

    SBS 2008 Setup Checklist
    http://blog.mpecsinc.ca/2009/04/sbs-2008-setup-checklist-v10.html

    VN:F [1.9.20_1166]
    Rating: 0.0/10 (0 votes cast)

    Windows 7 Pricing Announced – Pre-Orders Go Live

    Retail pricing for Windows 7 has officially been announced. Here’s the skinny on the Upgrades and the Full Packaged Products. All prices are Manufacturer’s Suggested Retail and in US Dollars

    Windows 7 Home Premium WINDOWS 7 HOME PREMIUM

    • Windows 7 Home Premium (Full): $199.99
    • Windows 7 Home Premium (Upgrade): $119.99

      Update: Special Upgrade Discount until July 11, 2009
      $119.99 $49.99 each (limit 3 per customer) 

    Windows 7 Professional WINDOWS 7 PROFESSIONAL

    • Windows 7 Professional (Full): $299.99
    • Windows 7 Professional (Upgrade): $199.99

      Update: Special Upgrade Discount until July 11, 2009
      $199.99 $99.99 each (limit 3 per customer) 

    Windows 7 Ultimate WINDOWS 7 ULTIMATE

    • Windows 7 Ultimate (Full): $319.99
    • Windows 7 Ultimate (Upgrade): $219.99 

    There is also a video with the details, including international availability: Click here

    Source: Windows 7 Blog

    VN:F [1.9.20_1166]
    Rating: 0.0/10 (0 votes cast)

    How To Create a FREE Password-Protected PDF

    imageThis question comes up a lot:

    I have the free Adobe Acrobat Reader, but not Acrobat Professional – can I still create a password-protected PDF?
    I don’t feel like paying $360 for Acrobat Professional
    just for the ability to do encryption or password protection.

    The short answer is ‘yes’, but you’ll need another program to do it.

    I recommend the FREE open source program PDF Creator 0.9.8 (16.8 MB).

    Below are detailed instructions you can share with your employees and clients:
    – (Part A) PDF Creator program installation instructions
    – (Part B) Creating the password-protected and encrypted PDFs
    – (Part C) PDF opening instructions

    PART A – PDF CREATOR INSTALLATION (Boring Part)

    1. Download PDF Creator 0.9.8 from SourceForge
      http://sourceforge.net/projects/pdfcreator/
    2. Double-click the PDFCreator-0_9_8_setup.exe file and choose Run.
      Choose Run
      (If User Account Control pops up in Vista or Windows 7, click Allow)
    3. Select your language (English) and click OK.
      Pick English and click OK
    4. When the setup Wizard launches, click Next.
      Setup - Click Next
    5. Accept the license agreement, and click Next.
      Accept the license agreement - click Next
    6. For Type of Installation, choose Standard installation, and click Next.
      Standard Installation - click Next
    7. For Printer name accept the default of “PDFCreator”, and click Next.
      Printer Name - click Next
    8. On Select Destination Location, accept the default and click Next.
      Default Installation Path - click Next
    9. The installation will install the PDFCreator Browser Add On (annoying) but you can later uninstall via the Control Panel.
      Uncheck “Yahoo!” and click Next.
      Uncheck Yahoo - click Next.
    10. Under Select Components, accept the defaults and click Next.
      Components - click Next
    11. On Select Start Menu Folder accept the default and click Next.
      Start Menu - click Next
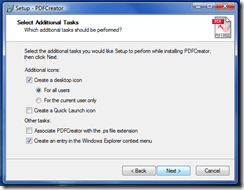
    12. On Select Additional Tasks accept the defaults and click Next.
      Additional Tasks - click Next
    13. And then click Install and click Finish when the installation is complete.
      Ready - click Install then click Finish

    Now that the PDF Creator program is installed, it’s time to convert a file into a password-protected PDF.

    PART B – CREATING A PASSWORD-PROTECTED PDFs
    (Interesting Part)

    1. Make sure the document that you want to convert is CLOSED.
    2. Right-click the icon of the document you want to convert, and choose
      Create PDF and Bitmap Files with PDFCreator from the pop-up.
      Right-click document, click Create PDF
    3. At the “It is necessary to temporarily set PDFCreator as defaultprinter” prompt click Don’t ask me again checkbox and click OK.
      Click Don't ask me again - click OK
    4. The document will open and then close again, and you will be left with a PDFCreator 0.9.8 dialog box, as shown below.Click the Options button.
      Click Options
    5. On the Options page, expand the Formats tab on the left.
      Expand Formats tab
    6. Click the PDF icon on the left, click the Security tab on the right, and check the Use Security checkbox.
      Click PDF, click Security tab, click Use Security
    7. Choose the following:
      – Encryption level (40-bit or 128-bit)
      – Password to open (user password)
      – Password to change permissions (owner password)
      – Any other user restrictions you want to set
      Pick encryption and password levels, click Save twice
    8. Hit Save on the bottom right of the Options page, and then Save again on the main PDFCreator 0.9.8 page (seen in Step 4 above).
    9. When the Save as dialog box comes up, give the file a name and
      click Save.
      Pick a file name and location - click Save
    10. PDF Creator will pop-up a small animated splash screen…image

      …and prompt you for the password you want to use to create your document. Enter the password twice and click OK.

      Pick a password - click OK

    11. If you leave the ‘Owner Password’ blank (which fine if you want to) you will get an additional dialog box letting you know that it’s blank. For more on PDF handling, read this post about whiting out a pdf document.
      Optional screen - only happens when Owner Password is blank
      Click Yes to leave the Owner Password blank, or click No to go back and add an Owner Password.
    12. Once the document is saved, it immediately tries to open in your preferred PDF reader (I use Foxit Reader) and prompts your for a password. Type the User Password and click OK.
      Enter password - click OK
    13. You should now be able to see your password-protected PDF.
      You're done dude!

    Congratulations – That’s a few hoops to jump through! 🙂

    PART C – WHAT THE CLIENT / RECIPIENT SEES
    (The most important part)

    1. E-mail them the password-protected PDF document
    2. They open the attachment and get prompted for a password
      Enter password - click OK
    3. Once they enter the password and click OK, the PDF opens.

    RECAP

    • Part A is just a one-time thing.
    • Part B is every time you want to CREATE a password-protected PDF
    • Part C is what the client (recipient) and does each time they want to OPEN the protected PDF.
    VN:F [1.9.20_1166]
    Rating: 9.8/10 (10 votes cast)

    Download – Windows Mobile 6.5 Emulator

    Windows Mobile 6.5 Professional Emulator Want to get your hands on Windows Mobile 6.5? Wait no longer!

    Title: Windows Mobile 6.5 Developer Tool Kit
    Version: 6.5
    Date Published: 06/03/2009
    Download size:
    – WM6.5 Professional (USA) 225.0 MB
    – WM6.5 Standard (USA) 71.4 MB
    File type: MSI
    System Requirements: XPSP3, Vista, Server 2003 SP2 
    Download URL: Click here

    Description:

    The Windows Mobile 6.5 Developer Tool Kit adds documentation, sample code, gesture APIs, header and library files, emulator images and tools to Visual Studio that let you build applications for Windows Mobile 6.5.

    Even if you’re not a WM developer, if you support Windows Mobile devices, you should download these emulator images.

    Emulator Images Included:

    • Windows Mobile 6.5 Professional Square Emulator
    • Windows Mobile 6.5 Professional QVGA Emulator
    • Windows Mobile 6.5 Professional WQVGA Emulator
    • Windows Mobile 6.5 Professional VGA Emulator
    • Windows Mobile 6.5 Professional WVGA Emulator
    • Windows Mobile 6.5 Standard Square Emulator
    • Windows Mobile 6.5 Standard QVGA Emulator

    Hint: You don’t need Visual Studio to use these emulator images. But if you want to these emulators to be able to communicate across the network and access the web, you’ll probably want to download and install Virtual PC 2007 (30.4 MB) if you haven’t done so already. The reason being; We just need the virtual network adapter, which is installed automatically when you install VPC 2007 – after that, we don’t need VPC 2007 anymore for the WM6.5 emulators.

    Configuring the Windows Mobile 6.5 emulator to connect to the Internet

    Once you’ve gotten the emulators downloaded and installed, here’s how you connect one to the network:

    1. Make sure Virtual PC 2007 is already installed (see box above).
    2. Open the emulator from the Windows Start Menu.
      Start Menu location of WM6.5 emulators
      The emulator should show a splash screen…
      WM 6.5 - Splash screen
      …and then drop you into the WM6.5 operating system.
    3. In the emulator choose File / Configure
      WM 6.5 - Configuration
    4. On the Network tab, check the Enable NE2000 PCMCIA network adapter to bind to, choose your network card, and click OK.
      WM 6.5 - Choosing a network card
    5. In the emulator, click on Start, then click on Settings
      WM6.5 - Start / Settings
    6. Click on Connections
      WM6.5 - Connections
    7. Click on Connections again
      WM6.5 - Connections again
    8. Click on the Advanced tab at the bottom, and choose Select Networks
      WM6.5 - Advanced / Select Networks
    9. Set both selections to My Work Network, and click OK twice.
      WM6.5 - My Work Network for both
    10. Once you’re back at the Today screen, click Start and then click Internet Explorer
      WM6.5 - Start / Internet Explorer
    11. On the Internet Explorer Mobile page, try searching on something to test your internet connectivity.
      WM6.5 - Search Page
    12. If you’ve done everything properly (including installing Virtual PC 2007 in the box above) you should be connected to the Internet.
      WM6.5 - Search Results 
    13. When you’re done using the emulator, you can choose File / Save State and Exit and the next time you launch the emulator (Step 2 above), you’ll pick up right back where you left off – already connected to the Internet.
      WM 6.5 - Saving State
      If you get prompted to enable the network card the next time you launch the emulator, just choose Yes.
      WM6.5 - Enable network card

    Props: Thanks Chris Rue’s blog for the heads-up on the WM6.5 download.

    VN:F [1.9.20_1166]
    Rating: 10.0/10 (3 votes cast)