How To Create a Bootable ShadowProtect USB Drive

ShadowProtect I really hate carrying around physical CDs/DVDs for programs I use a lot. Normally I just convert all my discs into ISOs with the free ImgBurn program (which totally rocks) and then throw the ISOs onto my Toshiba 320 GB portable USB drive. Then when I’m on-site if I need a CD, I just mount the ISO with Virtual CloneDrive (also free, and also rocks) and launch the program.

That said, sometimes you still need a bootable CD/DVD. For instance, when you want to image a workstation or server with StorageCraft ShadowProtect and backup the entire machine to an external USB drive.  Unfortunately, that means carrying the disc with you in your tech toolkit, or carrying the ISO and burning a disc.

Here’s a better idea – Use one of those old 1 GB USB flash drives gathering dust in your drawer, and turn it into a bootable USB drive.

Now, before you say “not BartPE and the HP Boot Flash Utility again”, we’re not using those old school tools. This is as modern as modern gets – using a Windows 7 64-bit ultimate machine and no physical CDs.

Note: These instructions are assuming you have already purchased a licensed copy of ShadowProtect from StorageCraft, and are simply looking to turn a boot CD into a boot USB flash drive.

What You’ll Need

  • ISO image of ShadowProtect or a ShadowProtect boot CD (471 MB)
  • 1 GB or larger USB flash drive
  • PeToUSB_3.0.0.7.zip (100KB)
  • Windows 7 workstation (I used a 64-bit Ultimate box, but YMMV)

Step-by-Step Instructions to Create the Bootable USB Drive

  1. Extract the downloaded PeToUSB_3.0.0.7.zip file into a folder on your desktop. You will see 3 files in there, but you only need  PeToUSB.exe
    Cool PeToUSB program
  2. Insert the physical ShadowProtect CD into your drive, or if you’re using an ISO, mount the ISO using Virtual CloneDrive (or some other ISO program).
    Mount the ISO or insert a ShadowProtect DVD
  3. Insert your USB flash drive.
    Insert the flash drive 
  4. Right-click the PeToUSB program, and choose RunAs Administrator.
    Make sure you RunAs administrator
  5. Select your flash drive from the pull-down menu.
    If this box is blank, you probably didn't use RunAs Administrator
  6. Check Enable Disk Format and check Quick Format boxes.
    Format and label 
  7. Browse to the ShadowProtect CD location.
    Find the physical CD or mounted ISO
  8. Click the Enable File Copy checkbox.
    image 

    Your settings should look similar to this:
    Double-check everything

  9. Click Start. On the Continue screen click Yes.
    Go baby, go.
  10. On the Are You Sure You Want To Continue screen, confirm that the correct flash drive is about to be formatted, and click Yes.
    Are you really sure?
  11. The drive will be automatically formatted and the files will start copying.
    PeToUSB is setting up the USB drive.
  12. When the format and copy are complete click OK.
    All done! 
  13. Safely Remove the drive, you’re done!

Now you can boot a workstation off the USB, plug in a USB drive large enough to hold the backup images, and create a backup of that target machine. Or, for some P2V action, you can use the free VMware Player (89.9 MB) to spin up that SPF as a virtual machine.

VN:F [1.9.20_1166]
Rating: 8.8/10 (4 votes cast)

Webcasts – Get Your MS Virtualization Learn On

Nowadays you can’t swing a dead cat without hitting someone who’s talking about virtualization. I’m guessing that your technicians are up-to-speed with virtualization, but are your sales folks?

Webcast screen shot Microsoft has a great series of webcasts for Microsoft Partners to give them the basics of virtualization with the following 4-part (6 segment) series with Ronald Grattopp and Bryan Von Axelson:

The Ultimate Sales Guide to Microsoft Virtualization

Note: You must have a Microsoft Partner ID linked with your Windows Live ID and sign in to view these webcasts.

Link to Desktop Virtualization sweepstakes Microsoft Desktop Virtualization Sweepstakes

In addition to some great (and free) information, Microsoft is providing an incentive for Microsoft Partners to attend these trainings. They are giving away:

  • Two (2) HP EX90 MediaSmart Servers
  • Eight (8) Sony Touch Readers

Webcasts in bold above are eligible for the Desktop Virtualization Sweepstakes. Sweepstakes ends April 12, 2010. See official website for details.

You can also stop by the Microsoft Virtualization portal:
http://www.microsoft.com/virtualization

VN:F [1.9.20_1166]
Rating: 0.0/10 (0 votes cast)

KYSBSUG Meeting #71 – Passwords

Invitation – January 2010 KYSBSUG Meeting #71
Meeting Date: Wednesday January 20, 2010
Time: 6:30 PM Eastern
Location: Money Concepts
Address: 323 Townpark Circle, Suite 100, Louisville, KY 40243
Topic: “Password Security and Password Cracking

Dana Epp - Microsoft MVP Guest Presenter: Dana Epp, MVP (Enterprise Security)
Founder & President of Scorpion Software (makers of AuthAnvil)

Website: http://www.scorpionsoft.com/
MVP: https://mvp.support.microsoft.com/profile/Dana.Epp
Blog: http://silverstr.ufies.org/blog/

Description: Dana Epp is an industry-recognized expert in security and Microsoft MVP (2006-2010). Dana will talk about local and remote password security in SBS and SMB networks. He’ll also talk about topics such as two-factor authentication and tell you how you can implement this technology for your employees and customers.

Following Dana’s presentation, we’ll have a hands-on lab to demonstrate some of the tools on the market and methods to test (and break) passwords.

6:30 – 6:45 – Local events & introductions
6:45 – 7:30 – Dana Epp presentation (via GoToMeeting)
7:30 – 7:45 – Dana Q&A
7:45 – 8:20 – Hands-on Lab
8:20 – 8:30 – Door prize drawing and wrap-up

Door Prize: This month our door prize is an NFR copy of Windows 7 Ultimate.
VN:F [1.9.20_1166]
Rating: 0.0/10 (0 votes cast)

More Windows 7 God Mode Hacks

Inspired by the cool findings on CNET regarding the Windows 7 ‘God Mode’ (as bloggers are calling it), and yet another post about additional features, I did some more digging to see what other options I could find.
First, the actual name for ‘God Mode’ is (anticlimactically) “All Tasks”:

Control Panel entry for All Tasks

I then did a search in the registry and found 39 more items I could use to create folders / shortcuts.

39 custom-created Control Panel shortcuts

They’re located under Computer\HKEY_CLASSES_ROOT\CSLID\
Most, but not all, of them have a REG_SZ key for “System.Software.TasksFileURL” which is set to “Internal”.
Registry key for System.Software.TasksFileURL

Here’s the list of registry keys / shortcuts that worked for me. Just create a new blank folder in Windows Explorer and give it one of the names below:

Action Center CPL.{BB64F8A7-BEE7-4E1A-AB8D-7D8273F7FDB6}
Administrative Tools.{D20EA4E1-3957-11d2-A40B-0C5020524153}
AutoPlay.{9C60DE1E-E5FC-40f4-A487-460851A8D915}
Backup and Restore.{B98A2BEA-7D42-4558-8BD1-832F41BAC6FD}
Biometrics.{0142e4d0-fb7a-11dc-ba4a-000ffe7ab428}
Computer.{20D04FE0-3AEA-1069-A2D8-08002B30309D}
Credential Manager.{1206F5F1-0569-412C-8FEC-3204630DFB70}
Default Location.{00C6D95F-329C-409a-81D7-C46C66EA7F33}
Device Center.{A8A91A66-3A7D-4424-8D24-04E180695C7A}
Display.{C555438B-3C23-4769-A71F-B6D3D9B6053A}
Ease of Access.{D555645E-D4F8-4c29-A827-D93C859C4F2A}
GodMode.{ED7BA470-8E54-465E-825C-99712043E01C}
HomeGroup Control Panel.{67CA7650-96E6-4FDD-BB43-A8E774F73A57}
Install New Programs.{15eae92e-f17a-4431-9f28-805e482dafd4}
Location.{00C6D95F-329C-409a-81D7-C46C66EA7F33}
Manage Wireless Networks.{1FA9085F-25A2-489B-85D4-86326EEDCD87}
Microsoft Windows Font Folder.{BD84B380-8CA2-1069-AB1D-08000948F534}
Network and Sharing Center.{8E908FC9-BECC-40f6-915B-F4CA0E70D03D}
Network Map.{E7DE9B1A-7533-4556-9484-B26FB486475E}
Network.{208D2C60-3AEA-1069-A2D7-08002B30309D}
Parental Controls.{96AE8D84-A250-4520-95A5-A47A7E3C548B}
Performance Information and Tools.{78F3955E-3B90-4184-BD14-5397C15F1EFC}
Personalization Control Panel.{ED834ED6-4B5A-4bfe-8F11-A626DCB6A921}
Power Options.{025A5937-A6BE-4686-A844-36FE4BEC8B6D}
Printers.{2227A280-3AEA-1069-A2DE-08002B30309D}
Programs and Features.{7b81be6a-ce2b-4676-a29e-eb907a5126c5}
Public Keys.{1D2680C9-0E2A-469d-B787-065558BC7D43}
Secure Startup.{D9EF8727-CAC2-4e60-809E-86F80A666C91}
Sensors.{E9950154-C418-419e-A90A-20C5287AE24B}
Set User Defaults.{17cd9488-1228-4b2f-88ce-4298e93e0966}
Speech Recognition.{58E3C745-D971-4081-9034-86E34B30836A}
Sync Center Folder.{9C73F5E5-7AE7-4E32-A8E8-8D23B85255BF}
System Recovery.{9FE63AFD-59CF-4419-9775-ABCC3849F861}
System.{BB06C0E4-D293-4f75-8A90-CB05B6477EEE}
Taskbar Icons.{05d7b0f4-2121-4eff-bf6b-ed3f69b894d9}
Troubleshooting.{C58C4893-3BE0-4B45-ABB5-A63E4B8C8651}
User Accounts.{60632754-c523-4b62-b45c-4172da012619}
Windows Firewall.{4026492F-2F69-46B8-B9BF-5654FC07E423}
Windows Update.{36eef7db-88ad-4e81-ad49-0e313f0c35f8}
Workspaces Center.{241D7C96-F8BF-4F85-B01F-E2B043341A4B}

I also found a bunch of registry keys for control panel items that I didn’t work for creating functional folder shortcuts (22 of them). Here’s that list, in case somebody knows how to make them work:

CardSpace.{78CB147A-98EA-4AA6-B0DF-C8681F69341C}
Color Management.{B2C761C6-29BC-4f19-9251-E6195265BAF1}
Date and Time Control Panel.{E2E7934B-DCE5-43C4-9576-7FE4F75E7480}
Device Manager.{74246bfc-4c96-11d0-abef-0020af6b0b7a}
Folder Options.{6DFD7C5C-2451-11d3-A299-00C04F8EF6AF}
Getting Started.{CB1B7F8C-C50A-4176-B604-9E24DEE8D4D1}
Indexing Options Control Panel.{87D66A43-7B11-4A28-9811-C86EE395ACF7}
Infrared.{A0275511-0E86-4ECA-97C2-ECD8F1221D08}
Internet Options.{A3DD4F92-658A-410F-84FD-6FBBBEF2FFFE}
Keyboard Control Panel
.{725BE8F7-668E-4C7B-8F90-46BDB0936430}
Mobility Center Control Panel.{5ea4f148-308c-46d7-98a9-49041b1dd468}
Mouse Control Panel.{6C8EEC18-8D75-41B2-A177-8831D59D2D50}
Pen and Touch Control Panel.{F82DF8F7-8B9F-442E-A48C-818EA735FF9B}
Phone and Modem Control Panel.{40419485-C444-4567-851A-2DD7BFA1684D}
Region and Language.{62D8ED13-C9D0-4CE8-A914-47DD628FB1B0}
Sound Control Panel.{F2DDFC82-8F12-4CDD-B7DC-D4FE1425AA4D}
Tablet PC Settings Control Panel.{80F3F1D5-FECA-45F3-BC32-752C152E456E}
Taskbar and Start Menu.{0DF44EAA-FF21-4412-828E-260A8728E7F1}
Text to Speech Control Panel.{D17D1D6D-CC3F-4815-8FE3-607E7D5D10B3}
Windows Defender.{D8559EB9-20C0-410E-BEDA-7ED416AECC2A}
Windows Sidebar Properties.{37efd44d-ef8d-41b1-940d-96973a50e9e0}
Windows SideShow.{E95A4861-D57A-4be1-AD0F-35267E261739}

As a workaround for the items in the second list, you can just navigate to the item, right-click it and choose “Create Shortcut”.

Creating a shortcut for Control Panel items

This will place a shortcut on your desktop that you can then move where ever you like. It’s a shortcut…

image

…but it works.

VN:F [1.9.20_1166]
Rating: 0.0/10 (0 votes cast)

Windows 7 ‘God Mode’ Hack

If you hate looking all over the control panel in Windows 7 for where Microsoft moved your favorite icon, you’ll love the “God Mode” hack. I found this on CNET.

Basically, you open Windows Explorer, navigate to the C: drive, create a new blank folder in Windows 7 and give it the following name:

GodMode.{ED7BA470-8E54-465E-825C-99712043E01C}

The folder icon changes automatically and you’ve got the ‘God Mode’ menu.

God Mode in Windows 7

Double-click that icon and you have one menu with about 275-295 menu choices (depending on the hardware and windows features installed) broken into the following categories:

  • Action Center (15 items)
     Action Center
  • Administrative Tools (10 items)
     Administrative Tools
  • AutoPlay (3 items)
     AutoPlay
  • Backup and Restore (2 items)
     Backup and Restore
  • BitLocker Drive Encryption (2 items – if you have BitLocker installed)
     BitLocker Drive Encryption
  • Color Management (1 item)
     Color Management
  • Credential Manager (1 item) 
    Credential Manager
  • Date and Time (4 items)
    Data and Time
  • Default Programs (2 items)
    Default Programs
  • Desktop Gadgets (6 items)
    Desktop Gadgets
  • Device Manager (1 item)
    Device Manager
  • Devices and Printers (9-11 items)
    Devices and Printers
    Note: I’ve also seen options for “Add a Bluetooth Device” and “Change Bluetooth Settings” on laptops.
  • Display (11 items)
    Display
  • Ease of Access Center (26 items)
    Ease of Access Center
  • Folder Options (5 items)
    Folder Options
  • Fonts (3 items)
    image
  • Getting Started (4 items)
    Getting Started
  • HomeGroup (2 items)
    HomeGroup
  • Indexing Options (1 item)
    Indexing Options
  • Internet Options (14 items)
    Internet Options
  • Keyboard (2 items)
    Keyboard
  • Location and Other Sensors (3 items)
    Location and Other Sensors
  • Mouse (8 items)
    Mouse
  • Network and Sharing Center (16 items)
    Network and Sharing Center
  • Notification Area Icons (6-7 items)
    Notification Area Icons
    Note: Laptops have a “Show or hide battery on the taskbar”
  • Parental Controls (1 item)
    Parental Controls
  • Performance Information and Tools (4 items)
    Performance Information and Tools
  • Personalization (12 items)
    Personalization
  • Phone and Modem (1 item)
    Phone and Modem
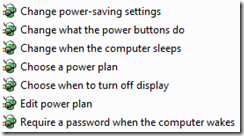
  • Power Options (7-8 items)
    Power Options
    Note: Laptops also show “Change battery settings”
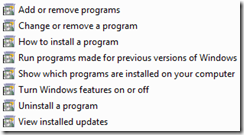
  • Programs and Features (8 items)
    Programs and Features
  • Recovery (1 item)
    Recovery
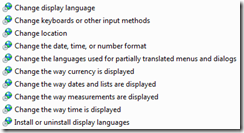
  • Region and Language (10 items)
    Region and Language
  • Remote App and Desktop Connections (1 item)
    Remote App and Desktop Connections
  • Sound (4 items)
    Sound
  • Speech Recognition (3 items)
    Speech Recognition
  • Sync Center (6 items)
    Sync Center
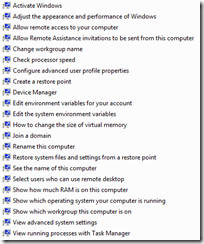
  • System (22 items)
    System
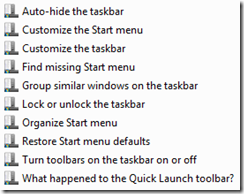
  • Taskbar and Start Menu (10 items)
    Taskbar and Start Menu
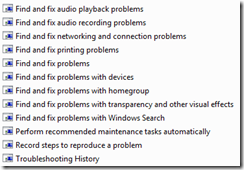
  • Troubleshooting (12 items)
    Troubleshooting
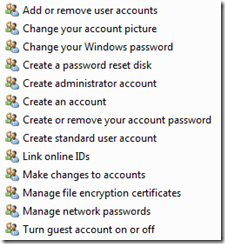
  • User Accounts (13 items)
    User Accounts
  • Windows CardSpace (1 item)
    Windows CardSpace
  • Windows Defender (1 item)
    Windows Defender
  • Windows Firewall (2 items)
    Windows Firewall
  • Windows Mobile Device Center (1 item – if you have it installed)
    Windows Mobile Device Center
  • Windows Update ( 2 items)
    Windows Update

Now you know why they call it ‘god mode’. 😉

VN:F [1.9.20_1166]
Rating: 10.0/10 (1 vote cast)

Training – Free SBS 2008 Hands-On Labs

image If you’ve been wishing for some structured Windows Small Business Server 2008 training offered by Microsoft, wait no more.  Microsoft has announced a set of four hands-on labs for SBS 2008, and (it gets better) it’s free!

Title: Windows SBS 2008 Hands-On Labs for Partners
Release Date: 9/25/2009
Version: 2.0
Download Size: 12.5 GB

The courses available are:

  1. Windows SBS 2008 Admin Console
  2. Windows SBS 2008 Working with Clients
  3. Windows SBS 2008 Installation
  4. Windows SBS 2008 Migration from SBS 2003

The downloads are available from the Microsoft Connect site:

URL: https://connect.microsoft.com/directory/
Invitation Code: SBSP-62B6-K3TH

System Requirements:

  • A machine that supports Hyper-V*;
        a server class** dual- or quad-core CPU is highly recommended
  • 5 GB of RAM min. (6-8 GB would be better);
        SBS 2008 requires a minimum of 4 GB of RAM, 
        Parent partition (Hyper-V host) requires 1 GB
  • 80 GB of free hard drive space;
        15 GB will be used initially but the VHDs could grow to a max. of 80 GB
  • Optional – router that will function between the SBS server and the Internet/corporate network
  • Optional – second physical network adapter to connect the SBS virtual machine to the router

Here’s a screen shot of the file downloads in the kit:

image

* Note: If you’ve never installed Hyper-V before, I’ve got a short video
(4:18 minutes) on YouTube demonstrating the installation.

** Server-class hardware is recommended, but not required since this is a HOL and not a production box. For example, here are my demo Hyper-V box specs:

  • HP Compaq dc5800 microtower
  • Intel Core 2 Duo E6550 2.33 GHz
  • 8 GB RAM
  • 1 ea. 149 GB SATA drive (OS)
  • 1 ea. 1 TB SATA drive (ISOs and VHDs)
  • Windows Server 2008 R2 Enterprise

To make sure that your machine supports Hyper-V (both in the BIOS and on the processor) check out the SecurAble download from GRC.com that tests hardware virtualization: http://www.grc.com/securable.htm

Props: Sean Daniel’s blog

VN:F [1.9.20_1166]
Rating: 0.0/10 (0 votes cast)

Webcast – Windows 7: Crystal Meth for Geeks

Join Susan Bradley and I this week as we combine super-forces to to give the following presentation:

Yes, this is my office, and I'm running Windows 7. -Tim Title: “Windows 7: It’s Like Crystal Meth for Geeks
Presenters: Susan Bradley [SBS-MVP] & Tim Barrett
Date: 10/22/2009
Time: 12:00 PM Noon Eastern (GMT –5)
Host: Third Tier
Link to attend: Click here

Description:
This presentation will help you understand the features of Windows 7. This version of Windows has many, many cool new features that end users are going to love and geeks will become addicted to. Susan and I share our favorite parts of Windows 7, and I’ll try not to act like a goober and embarrass her. Join us for all the fun!

VN:F [1.9.20_1166]
Rating: 0.0/10 (0 votes cast)

Download – Handy Computer Hardware Chart

Download the full-size image on the Click here link Title: Computer Hardware Chart
Author: Sonic840
File Size: 24.1 MB
Resolution: 4320 x 6120 pixels
Printed Size: 24×34”
Price: FREE
Download URL: Click here

Description: This handy reference chart includes over 170 different types computer reference pictures, including:

  • Notebook RAM
  • Desktop RAM
  • Power Connectors
  • Hard Drives
  • Ports
  • Processor Card Slots
  • Processor Card Sockets
  • Peripheral Cards
  • Desktop Card Slots
  • and CPU Sockets

Note: The download link for the big picture is on the left of side of that web page. You can also buy prints of that picture from the website, but they’re pretty spendy, when getting a computer then looking for computer mounts is a must.

VN:F [1.9.20_1166]
Rating: 8.0/10 (5 votes cast)

How To Create a FREE Password-Protected PDF

imageThis question comes up a lot:

I have the free Adobe Acrobat Reader, but not Acrobat Professional – can I still create a password-protected PDF?
I don’t feel like paying $360 for Acrobat Professional
just for the ability to do encryption or password protection.

The short answer is ‘yes’, but you’ll need another program to do it.

I recommend the FREE open source program PDF Creator 0.9.8 (16.8 MB).

Below are detailed instructions you can share with your employees and clients:
– (Part A) PDF Creator program installation instructions
– (Part B) Creating the password-protected and encrypted PDFs
– (Part C) PDF opening instructions

PART A – PDF CREATOR INSTALLATION (Boring Part)

  1. Download PDF Creator 0.9.8 from SourceForge
    http://sourceforge.net/projects/pdfcreator/
  2. Double-click the PDFCreator-0_9_8_setup.exe file and choose Run.
    Choose Run
    (If User Account Control pops up in Vista or Windows 7, click Allow)
  3. Select your language (English) and click OK.
    Pick English and click OK
  4. When the setup Wizard launches, click Next.
    Setup - Click Next
  5. Accept the license agreement, and click Next.
    Accept the license agreement - click Next
  6. For Type of Installation, choose Standard installation, and click Next.
    Standard Installation - click Next
  7. For Printer name accept the default of “PDFCreator”, and click Next.
    Printer Name - click Next
  8. On Select Destination Location, accept the default and click Next.
    Default Installation Path - click Next
  9. The installation will install the PDFCreator Browser Add On (annoying) but you can later uninstall via the Control Panel.
    Uncheck “Yahoo!” and click Next.
    Uncheck Yahoo - click Next.
  10. Under Select Components, accept the defaults and click Next.
    Components - click Next
  11. On Select Start Menu Folder accept the default and click Next.
    Start Menu - click Next
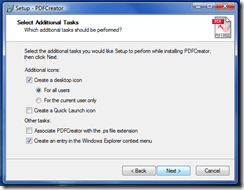
  12. On Select Additional Tasks accept the defaults and click Next.
    Additional Tasks - click Next
  13. And then click Install and click Finish when the installation is complete.
    Ready - click Install then click Finish

Now that the PDF Creator program is installed, it’s time to convert a file into a password-protected PDF.

PART B – CREATING A PASSWORD-PROTECTED PDFs
(Interesting Part)

  1. Make sure the document that you want to convert is CLOSED.
  2. Right-click the icon of the document you want to convert, and choose
    Create PDF and Bitmap Files with PDFCreator from the pop-up.
    Right-click document, click Create PDF
  3. At the “It is necessary to temporarily set PDFCreator as defaultprinter” prompt click Don’t ask me again checkbox and click OK.
    Click Don't ask me again - click OK
  4. The document will open and then close again, and you will be left with a PDFCreator 0.9.8 dialog box, as shown below.Click the Options button.
    Click Options
  5. On the Options page, expand the Formats tab on the left.
    Expand Formats tab
  6. Click the PDF icon on the left, click the Security tab on the right, and check the Use Security checkbox.
    Click PDF, click Security tab, click Use Security
  7. Choose the following:
    – Encryption level (40-bit or 128-bit)
    – Password to open (user password)
    – Password to change permissions (owner password)
    – Any other user restrictions you want to set
    Pick encryption and password levels, click Save twice
  8. Hit Save on the bottom right of the Options page, and then Save again on the main PDFCreator 0.9.8 page (seen in Step 4 above).
  9. When the Save as dialog box comes up, give the file a name and
    click Save.
    Pick a file name and location - click Save
  10. PDF Creator will pop-up a small animated splash screen…image

    …and prompt you for the password you want to use to create your document. Enter the password twice and click OK.

    Pick a password - click OK

  11. If you leave the ‘Owner Password’ blank (which fine if you want to) you will get an additional dialog box letting you know that it’s blank. For more on PDF handling, read this post about whiting out a pdf document.
    Optional screen - only happens when Owner Password is blank
    Click Yes to leave the Owner Password blank, or click No to go back and add an Owner Password.
  12. Once the document is saved, it immediately tries to open in your preferred PDF reader (I use Foxit Reader) and prompts your for a password. Type the User Password and click OK.
    Enter password - click OK
  13. You should now be able to see your password-protected PDF.
    You're done dude!

Congratulations – That’s a few hoops to jump through! 🙂

PART C – WHAT THE CLIENT / RECIPIENT SEES
(The most important part)

  1. E-mail them the password-protected PDF document
  2. They open the attachment and get prompted for a password
    Enter password - click OK
  3. Once they enter the password and click OK, the PDF opens.

RECAP

  • Part A is just a one-time thing.
  • Part B is every time you want to CREATE a password-protected PDF
  • Part C is what the client (recipient) and does each time they want to OPEN the protected PDF.
VN:F [1.9.20_1166]
Rating: 9.8/10 (10 votes cast)

Should I Sell Essential Business Server 2008?

If you’re a Microsoft Partner selling & supporting Windows Small Business Server, you’ve probably already asked yourself the question above.

The answer to that question depends primarily on you and your company, rather than on the features or maturity EBS product itself. The reason being; the EBS market is vastly different than the SBS market. Different not just in scale and dollars involved, but in expectation management, project planning, level of communication, and perhaps even in the way you invoice.

Chris Rue - If you’ve been eyeballing EBS and looking at moving towards the mid-markets, or even if you’ve already been there for quite some time, you will definitely benefit from watching Chris Rue’s 5W/50 webcast:

Title: “Adding Essential Business Server to Your Infrastructure Practice”
Presenter: Chris Rue [EBS-MVP] CEO of Black Warrior Technology, LLC and David Fabritius, Technical Product Manager (SBS/EBS) at Microsoft
Date recorded: 04/10/2009 at 12:00 PM Eastern
Registration URL: https://training.partner.microsoft.com/plc/details.aspx?systemid=1855857&page=/plc/search.aspx

MY TAKE ON THIS WEBCAST
Have you ever wanted to sit down over beers and pick the brain of an expert in a product or market? This webcast is like that. It’s directed at Microsoft Partners, and it’s a real eye-opener for SMB folks who haven’t had much mid-market experience. Chris definitely knows his stuff. This webcast is well worth your time, and I HIGHLY recommend it – fantastic job Chris!

Also, hats off to the folks at Microsoft for putting the 5W/50 webcast series together! To Eric Ligman, Mike Iem, the presenters and crew, You guys rock!

VN:F [1.9.20_1166]
Rating: 0.0/10 (0 votes cast)