“I have the free Adobe Acrobat Reader, but not Acrobat Professional – can I still create a password-protected PDF?
I don’t feel like paying $360 for Acrobat Professional
just for the ability to do encryption or password protection.”
The short answer is ‘yes’, but you’ll need another program to do it.
I recommend the FREE open source program PDF Creator 0.9.8 (16.8 MB).
Below are detailed instructions you can share with your employees and clients:
– (Part A) PDF Creator program installation instructions
– (Part B) Creating the password-protected and encrypted PDFs
– (Part C) PDF opening instructions
PART A – PDF CREATOR INSTALLATION (Boring Part)
- Download PDF Creator 0.9.8 from SourceForge
http://sourceforge.net/projects/pdfcreator/ - Double-click the PDFCreator-0_9_8_setup.exe file and choose Run.

(If User Account Control pops up in Vista or Windows 7, click Allow) - Select your language (English) and click OK.

- When the setup Wizard launches, click Next.

- Accept the license agreement, and click Next.

- For Type of Installation, choose Standard installation, and click Next.

- For Printer name accept the default of “PDFCreator”, and click Next.

- On Select Destination Location, accept the default and click Next.

- The installation will install the PDFCreator Browser Add On (annoying) but you can later uninstall via the Control Panel.
Uncheck “Yahoo!” and click Next.

- Under Select Components, accept the defaults and click Next.

- On Select Start Menu Folder accept the default and click Next.

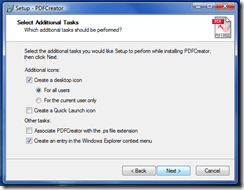
- On Select Additional Tasks accept the defaults and click Next.

- And then click Install and click Finish when the installation is complete.

Now that the PDF Creator program is installed, it’s time to convert a file into a password-protected PDF.
PART B – CREATING A PASSWORD-PROTECTED PDFs
(Interesting Part)
- Make sure the document that you want to convert is CLOSED.
- Right-click the icon of the document you want to convert, and choose
Create PDF and Bitmap Files with PDFCreator from the pop-up.

- At the “It is necessary to temporarily set PDFCreator as defaultprinter” prompt click Don’t ask me again checkbox and click OK.

- The document will open and then close again, and you will be left with a PDFCreator 0.9.8 dialog box, as shown below.Click the Options button.

- On the Options page, expand the Formats tab on the left.

- Click the PDF icon on the left, click the Security tab on the right, and check the Use Security checkbox.

- Choose the following:
– Encryption level (40-bit or 128-bit)
– Password to open (user password)
– Password to change permissions (owner password)
– Any other user restrictions you want to set

- Hit Save on the bottom right of the Options page, and then Save again on the main PDFCreator 0.9.8 page (seen in Step 4 above).
- When the Save as dialog box comes up, give the file a name and
click Save.

- PDF Creator will pop-up a small animated splash screen…

…and prompt you for the password you want to use to create your document. Enter the password twice and click OK.
- If you leave the ‘Owner Password’ blank (which fine if you want to) you will get an additional dialog box letting you know that it’s blank. For more on PDF handling, read this post about whiting out a pdf document.

Click Yes to leave the Owner Password blank, or click No to go back and add an Owner Password. - Once the document is saved, it immediately tries to open in your preferred PDF reader (I use Foxit Reader) and prompts your for a password. Type the User Password and click OK.

- You should now be able to see your password-protected PDF.

Congratulations – That’s a few hoops to jump through! 🙂
PART C – WHAT THE CLIENT / RECIPIENT SEES
(The most important part)
- E-mail them the password-protected PDF document
- They open the attachment and get prompted for a password

- Once they enter the password and click OK, the PDF opens.
RECAP
- Part A is just a one-time thing.
- Part B is every time you want to CREATE a password-protected PDF
- Part C is what the client (recipient) and does each time they want to OPEN the protected PDF.


wow…It was really very helpful…THANK U VERY MUCH..for detailed description…!!!!
Hi – you can also use http://www.pdfsecure.net/ to secure your PDF online, and there is no download required.
Hello, I was very hopeful to see this wonderful post… but – after installing the pdfCreator, when right-clicking the document – I don't get the option you mention. so – I tried to open the docx file and print it to pdfCreator and got the options and the security settings as suggested – but when saving – got only one line to enter the password and the ok button was not activated. Can you give me a clue – why it's not working for me?
With thanks – Sharon
great tutorial thank you.
Thnks………………u………………………………….
thanks you very much.. it was really helpfull info
want to do this exact thing but to multiple pdf files at once… any idea how to ?
Hi. I tried the PDF Creator. Its cool to create password protect pdf from a word or excel. However, if my original document is a pdf file itself, I can't use pdf creator to password protect the pdf file? Any other free solutions to password protect a original pdf file?
These days, PDF documents are everywhere. The renowned file format is perfect for financial documents and carpool schedules, allowing you to capture the entirety of fix-layout documents — fonts, graphics, page order, etc…..convert epub to pdf